It got me thinking about a 3D digital artwork I created some time ago called "Rainy Day at the Lake."
I wanted a typical English scene - a cloudy, rainy day, with a family of ducks paddling across a pond in the driving rain.
Here's the image. It's been popular on mousepads and cards in my Zazzle store, and it's also available on canvas and as prints at www.jaynewilsonart.com
I thought I would get my blog started up again this year by showing how the image was made, the steps it took to create it.
I created it in Vue, by e-On Software, a 3D digital art program.
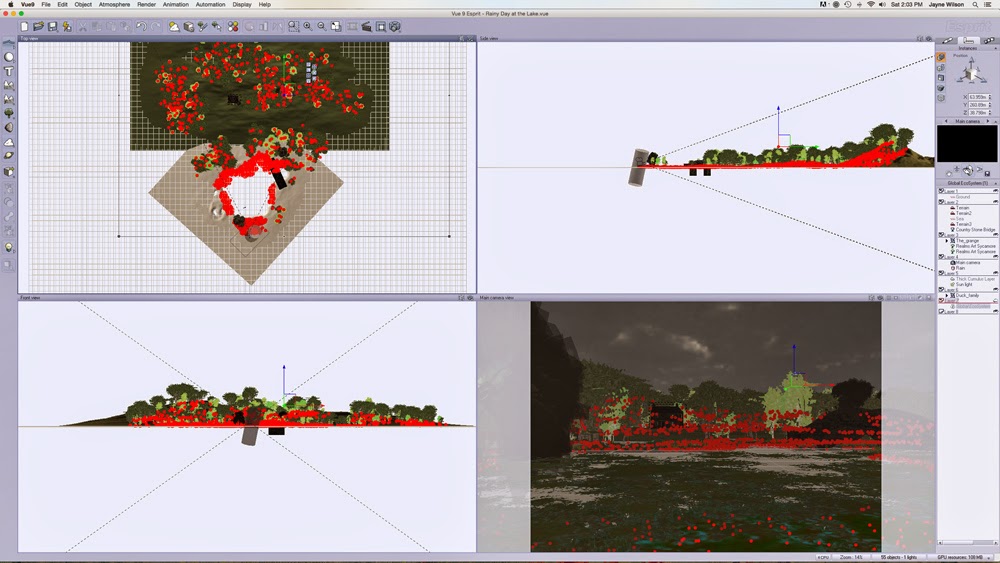
As you work in Vue, the workspace is divided into four panes, each giving a different view of your scene.
The top right hand pane is the view from the top - useful for placing one element behind another. From above, you can see dotted lines, which show the visual scope of the
"camera" (the point from which the image is rendered).
The area within those lines will be in your render, so you need
to make sure everything is well placed. Outside those lines, it
doesn't matter and you can keep the file size down by not populating
those area with lots of detail such as trees, grass etc.
Top View
Additional windows show you views from the front and from the side. All these view aid in placing objects within the 3D environment that Vue creates inside your computer. The bottom right hand pane shows you the camera view, this is how your final render will look.
Vue Workspace
The main detail of this scene would be the lake. My vision was to have a grassy foreground, the lake in the middle ground and the far bank, with some trees and a house in the background and a stone bridge on the right, providing access to the house. To create the lake I added a standard terrain and began "excavating."
Terrain Editor
I'm still learning how to manipulate terrains but I knew this one didn't have to be too detailed, because of the viewpoint of the camera. All that would be seen would be the far bank. Everything else would be out of the view of the camera.
Then I added a water plane and applied a material, one of a purchased set with the effect of rain drops on the water surface.
The next thing to do was to add the atmosphere for which I used Vue's versatile Atmosphere editor and selected one of the stock atmospheres. As usual I made some minor tweaks to get the general look I wanted.
Then I went about adding that rain. This was done by creating a cylinder object, to which I added a transparent mat that I created in Photoshop Elements with my raindrops "painted" on it. This was centered over the camera, so the camera was actually looking through it to the rest of the scene. I rotated it on the x axis to give the rain a bit of a slant.
Once I had the terrains and atmosphere done, I added the other elements, such as the house and the bridge. These were purchased models which I then resized and positioned along the x, y and z axis using the "gizmos" in Vue until they were where I wanted them, and in proportionate size.
The next step is adding the vegetation -- trees, plants, grasses. This can either be done by applying an Ecostyem to an entire terrain, or by painting the ecosystem only where it is needed.
As my system gets bogged down by huge ecosystems that populate the entire scene, I usually use the latter option and just paint them where needed. This can be done individually or with an airbrush type of effect.

Ecosystem
You can see the red dots indicating the locations of the trees and grasses in this screen shot. As you can see in the top left pane, I only placed them within the dotted lines indicated the field of vision of the camera -- much easier for my computer to handle!
At this point it becomes a case of making test or preview renders, then making adjustments as necessary until I'm happy with the scene. I usually do lots of test renders and then, when I think it's complete, I usually do one more because I always seem to find a glaring error staring me right in the face!
But eventually I get to the point where I am happy with the finished image and can do a final render.
I hope you have enjoyed this glimpse at the world of the 3D artist.


