Showing posts with label landscape. Show all posts

Saturday, January 10, 2015

The Making of "Rainy Day at the Lake"

It's a cold, wet, dreary day in Texas.  The sort of day to curl up on the sofa and read a book, or do some artwork, or watch a movie!

It got me thinking about a 3D digital artwork I created some time ago called "Rainy Day at the Lake."

I wanted a typical English scene - a cloudy, rainy day, with a family of ducks paddling across a pond in the driving rain.

Here's the image.  It's been popular on mousepads and cards in my Zazzle store, and it's also available on canvas and as prints at www.jaynewilsonart.com


I thought I would get my blog started up again this year by showing how the image was made, the steps it took to create it.

I created it in Vue, by e-On Software, a 3D digital art program.

As you work in Vue, the workspace is divided into four panes, each giving a different view of your scene. 

The top right hand pane is the view from the top - useful for placing one element behind another. From above, you can see dotted lines, which show the visual scope of the "camera" (the point from which the image is rendered). 

The area within those lines will be in your render, so you need to make sure everything is well placed.  Outside those lines, it doesn't matter and you can keep the file size down by not populating those area with lots of detail such as trees, grass etc.

Top View
 

Additional windows show you views from the front and from the side.  All these view aid in placing objects within the 3D environment that Vue creates inside your computer.  The bottom right hand pane shows you the camera view, this is how your final render will look.

Vue Workspace

The main detail of this scene would be the lake.  My vision was to have a grassy foreground, the lake in the middle ground and the far bank, with some trees and a house in the background and a stone bridge on the right, providing access to the house.  To create the lake I added a standard terrain and began "excavating." 

Terrain Editor

I'm still learning how to manipulate terrains but I knew this one didn't have to be too detailed, because of the viewpoint of the camera.  All that would be seen would be the far bank.  Everything else would be out of the view of the camera.

Then I added a water plane and applied a material, one of a purchased set with the effect of rain drops on the water surface.

The next thing to do was to add the atmosphere for which I used Vue's versatile Atmosphere editor and selected one of the stock atmospheres.  As usual I made some minor tweaks to get the general look I wanted. 

Then I  went about adding that rain. This was done by creating a cylinder object, to which I added a transparent mat that I created in Photoshop Elements with my raindrops "painted" on it.  This was centered over the camera, so the camera was actually looking through it to the rest of the scene.  I rotated it on the x axis to give the rain a bit of a slant.


Once I had the terrains and atmosphere done,  I added the other elements, such as the house and the bridge. These were purchased models which I then resized and positioned along the x, y and z axis using the "gizmos" in Vue until they were where I wanted them, and in proportionate size.


The next step is adding the vegetation -- trees, plants, grasses.  This can either be done by applying an Ecostyem to an entire terrain, or by painting the ecosystem only where it is needed.

As my system gets bogged down by huge ecosystems that populate the entire scene, I usually use the latter option and just paint them where needed. This can be done individually or with an airbrush type of effect.
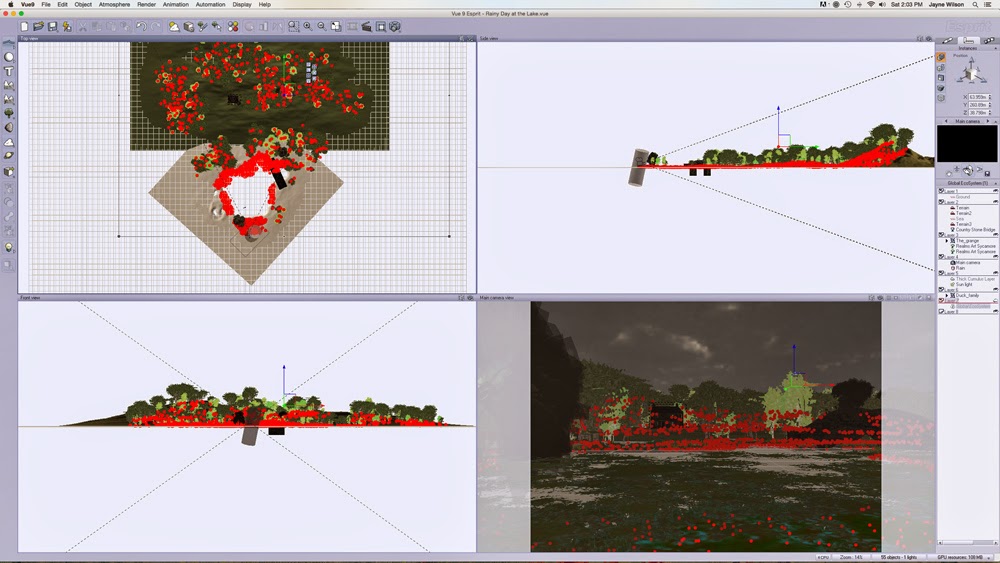
 
Ecosystem

You can see the red dots indicating the locations of the trees and grasses in this screen shot. As you can see in the top left pane, I only placed them within the dotted lines indicated the field of vision of the camera -- much easier for my computer to handle!

At this point it becomes a case of making test or preview renders, then making adjustments as necessary until I'm happy with the scene.  I usually do lots of test renders and then, when I think it's complete, I usually do one more because I always seem to find a glaring error staring me right in the face!  

But eventually I get to the point where I am happy with the finished image and can do a final render.


I hope you have enjoyed this glimpse at the world of the 3D artist.


Saturday, July 26, 2014

The Hay Field

As I mentioned in a recent blog post, I have recently got back into painting with soft pastels.  After several years of no art in my life at all, and then a few years creating art digitally, it's been fun, interesting and therapeutic to put pastel to paper and see what I can create.


The first thing I realized was that, if I wanted to work in my current studio, I would need better light.  My studio is actually the formal dining room of our home (we use the breakfast nook as our dining room).

My studio, which I named "Mockingbird Studio", is in the center of the house and although it's open on two sides to the living room and kitchen, it doesn't get direct light.  That was fine when working on the computer, not so useful when working on an easel.

I started looking for lamp setups for an art studio and found what I needed in the Daylight Lamp.  It was a bit pricey, but I had a birthday coming up and I put it on my wishlist.

My wonderful husband bought it for me for my birthday and we rearranged my desk a bit to enable me to use it and my easel next to my computer.


This will enable me to view video tutorials while I'm working alongside at my easel.  I love it!

Anyway, on to my latest artwork (sneak preview above).

On the way home from seeing my horse at the barn last weekend, I caught sight of a lovely view that I really wanted to try and paint in pastels.  If I had my camera with me, I probably would have stopped and taken a reference photo.  As it was I tried to commit it to memory as I sped by and when I got home, I did something I haven't done in decades - I sketched the scene!


As you can tell, I'm not a sketch artist, but I was able to get enough of a feel for the scene that today I decided to try and do it in pastels.


I simplified it by only putting in two round hay bales, instead of the 12 I had in my sketch which I think would have been a) impossible to do and b) made the picture look too "busy".

This is the first one I've tried to do from scratch, without following a tutorial or a lesson in a book.


Naturally, I can see things now that could/should be changed to make it less amateurish but I think that on the whole, I'm pretty happy with the way it came out.


Sunday, June 8, 2014

The Great American Road Trip

I'm originally from England and although I have lived in the U.S. for over 30 years, up until last year I had actually seen very little of it.

That was when my husband decided to plan a cross country road trip for us. It really was the trip of a lifetime and we came home with a treasure chest of memories and hundreds of photographs.

Our first stop was Carlsbad Caverns in New Mexico. The caverns were spectacular, to say the least!

It was a first test for my new camera, and although not all of the photos were successful, there were a few gems among them. I thought this particular formation, The Chinese Theater, was especially photogenic.


We couldn't go on a Great American Road Trip without visiting the Grand Canyon could we?

Unfortunately it was a bit hazy while we were there and for most of the day we didn't see the canyon in all it's glory.  However, my husband booked us on the "Sunset Tour" and while the driver was concerned that we might not be lucky, in actual fact, once the sun got down to the horizon, it broke out underneath the cloud layer and we were treated to some spectacular views.


I was worried that our drive across Nevada might be a bit dull - miles upon miles of desert terrain.  However, it was far from it.  For a start, the "Great Basin" as it is called, is surrounded on all sides by mountains, which we don't have down here in my area of Texas.  And then we kept seeing these dust devils around us.  I was fascinated by them, and became determined to get a photo.

Let me tell you, it's not easy to get a photo of a dust devil through the bug-spattered windshield of a car at 55 mph, but after numerous failures, I finally got a good photo.


Later in our trip, we visited Bryce Canyon in Utah. Interestingly, the 3D graphics programs my husband introduced me to when we met is called Bryce and was actually named after Bryce Canyon.

Below is the promo image from Bryce 5.5, actually created in the program itself, and below it is a photograph I took from Ponderosa Point at Bryce Canyon.


Can you see where the  inspiration for the promo image came from?  


Our trip eventually took us across the Sierras to the West Coast.  On the way, we stopped at beautiful Lake Tahoe.  This is one place I have been before and can never get tired of it.  I haven't even been there in winter yet!

This is one of many photos I took as we went on a drive around the lake.  I call it "Lake Tahoe Through the Trees.


 I'm rather proud of this photograph as it recently earned a Special Recognition in the 4th Annual "Landscapes" Art Competition held by the Light, Space and Time Online Art Gallery.  This was quite an accomplishment as there were 587 entries from around the world!

Everywhere we went, in addition to being committed to taking the best photographs we could, Eric and I found ourselves getting ideas and inspiration for digital landscapes to create in Vue, the 3D graphics software we now use.

Below is an image rendered in Vue of Emerald Bay at Lake Tahoe.  I didn't create this - it was a sample scene that came with Vue when I purchased it, to show the power of the program.  All I did was click on the render button, so I can't take any credit.


Below is a older Vue render inspired by my first trip to Lake Tahoe, several years ago.  I created this from scratch and of course I can find faults with it now. But on the whole, I'm rather pleased with how it came out.


Some of my best photographs from The Great American Road Trip are available as prints and art cards on my website at www.jaynewilsonart.com and I will probably add some more in the coming weeks.