Showing posts with label 3d art. Show all posts

Saturday, January 10, 2015

The Making of "Rainy Day at the Lake"

It's a cold, wet, dreary day in Texas.  The sort of day to curl up on the sofa and read a book, or do some artwork, or watch a movie!

It got me thinking about a 3D digital artwork I created some time ago called "Rainy Day at the Lake."

I wanted a typical English scene - a cloudy, rainy day, with a family of ducks paddling across a pond in the driving rain.

Here's the image.  It's been popular on mousepads and cards in my Zazzle store, and it's also available on canvas and as prints at www.jaynewilsonart.com


I thought I would get my blog started up again this year by showing how the image was made, the steps it took to create it.

I created it in Vue, by e-On Software, a 3D digital art program.

As you work in Vue, the workspace is divided into four panes, each giving a different view of your scene. 

The top right hand pane is the view from the top - useful for placing one element behind another. From above, you can see dotted lines, which show the visual scope of the "camera" (the point from which the image is rendered). 

The area within those lines will be in your render, so you need to make sure everything is well placed.  Outside those lines, it doesn't matter and you can keep the file size down by not populating those area with lots of detail such as trees, grass etc.

Top View
 

Additional windows show you views from the front and from the side.  All these view aid in placing objects within the 3D environment that Vue creates inside your computer.  The bottom right hand pane shows you the camera view, this is how your final render will look.

Vue Workspace

The main detail of this scene would be the lake.  My vision was to have a grassy foreground, the lake in the middle ground and the far bank, with some trees and a house in the background and a stone bridge on the right, providing access to the house.  To create the lake I added a standard terrain and began "excavating." 

Terrain Editor

I'm still learning how to manipulate terrains but I knew this one didn't have to be too detailed, because of the viewpoint of the camera.  All that would be seen would be the far bank.  Everything else would be out of the view of the camera.

Then I added a water plane and applied a material, one of a purchased set with the effect of rain drops on the water surface.

The next thing to do was to add the atmosphere for which I used Vue's versatile Atmosphere editor and selected one of the stock atmospheres.  As usual I made some minor tweaks to get the general look I wanted. 

Then I  went about adding that rain. This was done by creating a cylinder object, to which I added a transparent mat that I created in Photoshop Elements with my raindrops "painted" on it.  This was centered over the camera, so the camera was actually looking through it to the rest of the scene.  I rotated it on the x axis to give the rain a bit of a slant.


Once I had the terrains and atmosphere done,  I added the other elements, such as the house and the bridge. These were purchased models which I then resized and positioned along the x, y and z axis using the "gizmos" in Vue until they were where I wanted them, and in proportionate size.


The next step is adding the vegetation -- trees, plants, grasses.  This can either be done by applying an Ecostyem to an entire terrain, or by painting the ecosystem only where it is needed.

As my system gets bogged down by huge ecosystems that populate the entire scene, I usually use the latter option and just paint them where needed. This can be done individually or with an airbrush type of effect.
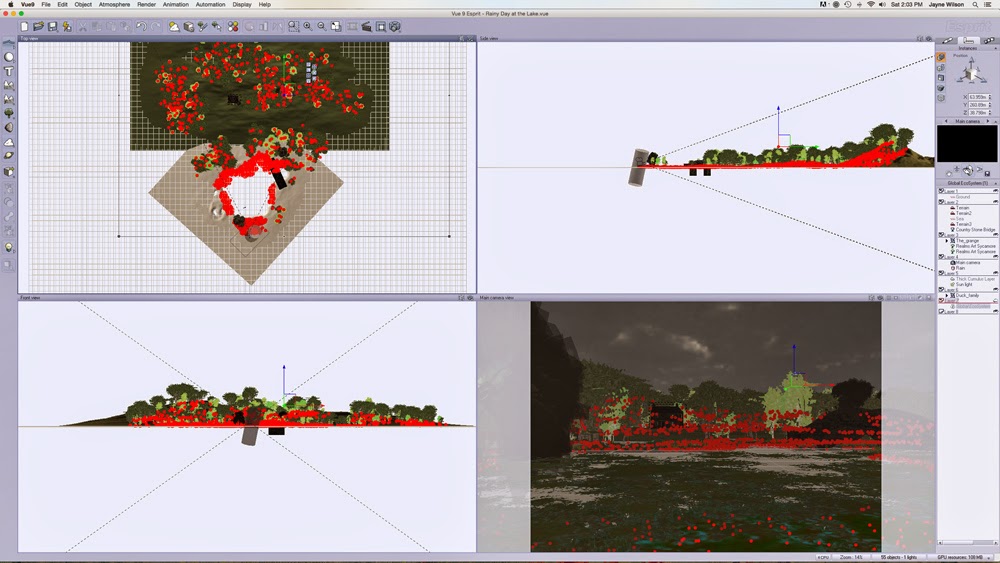
 
Ecosystem

You can see the red dots indicating the locations of the trees and grasses in this screen shot. As you can see in the top left pane, I only placed them within the dotted lines indicated the field of vision of the camera -- much easier for my computer to handle!

At this point it becomes a case of making test or preview renders, then making adjustments as necessary until I'm happy with the scene.  I usually do lots of test renders and then, when I think it's complete, I usually do one more because I always seem to find a glaring error staring me right in the face!  

But eventually I get to the point where I am happy with the finished image and can do a final render.


I hope you have enjoyed this glimpse at the world of the 3D artist.


Sunday, June 8, 2014

The Great American Road Trip

I'm originally from England and although I have lived in the U.S. for over 30 years, up until last year I had actually seen very little of it.

That was when my husband decided to plan a cross country road trip for us. It really was the trip of a lifetime and we came home with a treasure chest of memories and hundreds of photographs.

Our first stop was Carlsbad Caverns in New Mexico. The caverns were spectacular, to say the least!

It was a first test for my new camera, and although not all of the photos were successful, there were a few gems among them. I thought this particular formation, The Chinese Theater, was especially photogenic.


We couldn't go on a Great American Road Trip without visiting the Grand Canyon could we?

Unfortunately it was a bit hazy while we were there and for most of the day we didn't see the canyon in all it's glory.  However, my husband booked us on the "Sunset Tour" and while the driver was concerned that we might not be lucky, in actual fact, once the sun got down to the horizon, it broke out underneath the cloud layer and we were treated to some spectacular views.


I was worried that our drive across Nevada might be a bit dull - miles upon miles of desert terrain.  However, it was far from it.  For a start, the "Great Basin" as it is called, is surrounded on all sides by mountains, which we don't have down here in my area of Texas.  And then we kept seeing these dust devils around us.  I was fascinated by them, and became determined to get a photo.

Let me tell you, it's not easy to get a photo of a dust devil through the bug-spattered windshield of a car at 55 mph, but after numerous failures, I finally got a good photo.


Later in our trip, we visited Bryce Canyon in Utah. Interestingly, the 3D graphics programs my husband introduced me to when we met is called Bryce and was actually named after Bryce Canyon.

Below is the promo image from Bryce 5.5, actually created in the program itself, and below it is a photograph I took from Ponderosa Point at Bryce Canyon.


Can you see where the  inspiration for the promo image came from?  


Our trip eventually took us across the Sierras to the West Coast.  On the way, we stopped at beautiful Lake Tahoe.  This is one place I have been before and can never get tired of it.  I haven't even been there in winter yet!

This is one of many photos I took as we went on a drive around the lake.  I call it "Lake Tahoe Through the Trees.


 I'm rather proud of this photograph as it recently earned a Special Recognition in the 4th Annual "Landscapes" Art Competition held by the Light, Space and Time Online Art Gallery.  This was quite an accomplishment as there were 587 entries from around the world!

Everywhere we went, in addition to being committed to taking the best photographs we could, Eric and I found ourselves getting ideas and inspiration for digital landscapes to create in Vue, the 3D graphics software we now use.

Below is an image rendered in Vue of Emerald Bay at Lake Tahoe.  I didn't create this - it was a sample scene that came with Vue when I purchased it, to show the power of the program.  All I did was click on the render button, so I can't take any credit.


Below is a older Vue render inspired by my first trip to Lake Tahoe, several years ago.  I created this from scratch and of course I can find faults with it now. But on the whole, I'm rather pleased with how it came out.


Some of my best photographs from The Great American Road Trip are available as prints and art cards on my website at www.jaynewilsonart.com and I will probably add some more in the coming weeks.

Saturday, May 24, 2014

The Story Behind "Here Without You"

My husband and I will celebrate our seventh anniversary later this year, but we've actually known each other quite a bit longer than that.

We met in an online chat room, back when they were all the rage, and maintained a long distance relationship for four years, before our wedding in 2007.

During that time Eric introduced me to the digital art programs Bryce and DAZ and, encouraged by his sister, also a prolific digital artist, I got hooked!

"Here Without You" is one of my earlier digital artworks, created in DAZ 3D.  I created it on a long night sitting at home alone listening to our special music on iTunes.


Not surprisingly, given the title I finally gave it, I was listening to "Here Without You" by Three Doors Down when I came up with the idea for this piece.

I wanted to convey the longing I myself was feeling, waiting for Eric's next visit or the day we could finally be together forever.

If you look closely, you'll see that she has an actual photograph of my then fiance balanced on her lap -- thanks to the wonders of 3D graphics programs I was able to apply the photo to a small rectangular plane and then position it on her lap like a much loved portrait.

Even now when I look at this piece, it really takes me back to those days and everything it took for us to meet, get together and finally be able to marry.

Not all online relationships work out, but I'm very happy that ours worked out so well.


Friday, November 1, 2013

"Lazy River" Wins Special Merit Award

When my husband and I first delved in to Vue, by E-On Software, we downloaded the freebie "Personal Learning Edition" which offered all the features of the full version, but with some restrictions.

First of all, it limited the size of your render. and second it put a large logo in the corner of the image.

But it allowed us to see the possibilities of the software and to start playing around with it enough to discuss purchasing the full version.


When, after a certain amount of time, every single render with the "PLE" had multiple watermarks checkered across the image, we finally decided to go ahead and make our purchases. That was sometime in 2011.

Vue comes in several editions, from the Extreme (all bells and whistles and then some - the sort of program used to work on CGI movies like Avatar) down to a stripped down version that I forget the name of.

We went for the Esprit version, which is somewhere in the middle price range, and we added on a couple of modules for increased functionality -- the Ecosystem and Ecopainter modules, (in my mind, probably THE most impressive feature of Vue which allows you to populate your scenes with vegetation - grasses, plants, trees etc.) and also the Botanica module, which allows you to edit plants and trees.

The very first scene I worked on once I had my new software installed was a scene with a quiet stream with reeds and trees along the banks.  I played around with several different atmospheres until I found just the right serene misty look I was after.

And just for good measure I added a family of ducks that were created and posed in DAZ 3D and then imported as a Wavefront Object into Vue.

I named the piece "Lazy River" and it has remained one of my favorite artworks.


A month or so ago, I decided to enter it, among some other pieces, into an International Juried Art Competition organized by the Light, Space Time, Jupiter, Florida.

I just found out today that it earned a Special Merit Award! Apparently, the gallery received 673 entries from 24 different countries and from 36 different states and the District of Columbia, so to earn a Special Merit award is a huge honor!


Excuse me while I pat myself on the back :-)

Thursday, October 3, 2013

The Making of Country Lane in Fall

Fall is my favorite season. I love fall colors, even though we really don't get much in the way of fall color here in Texas.  It seems to me that the leaves stay green until they just drop off the trees here.

That could be why I enjoy creating artwork which features fall colors.

A couple of weeks ago I started working on a new artwork which I entitled "Country Lane in Fall".

What follows is a little detail about how I created it in Vue.  I'll show you the actual image at the end of the post :-)  As always, you can click on the images to see a larger version.

 ***

I had an idea of what I wanted, but creating it in Vue was a bit of a challenge as my technical skills are still lacking in some areas.  I'm just not very good at sculpting terrains yet.  Usually, I load a standard heightfield terrain and squish it almost flat.


That creates a nice enough base for many scenes.  I often use something like that for the foreground and then add hills in the background.

But for the scene I had in mind, I wanted a country lane, complete with cart tracks, or tractor tracks in the dirt.

Some time ago I watched a video tutorial which showed something similar to what I wanted, and it used a "heightmap", basically a greyscale image that Vue would blend with it's own fractal terrain to modify it.

So first, here is the standard heightfield terrain in Vue.  There are all sorts of tools for tweaking it and creating impressive terrains but I'm still learning how to use them.


Next, in Photoshop Elements, I created a new file and "painted" a country lane.  I used a fuzzy edged brush in grey to create the lane and then a darker color to create the deeper tracks.  (lighter colors create higher terrains, darker colors are lower)


Within the "Terrain Editor" in Vue, you import your jpeg file and specify the proportions you want to use - i.e. do you want more of the default terrain or do you want more of your jpeg image?

I selected roughly 50/50 between the two.  It gives you a rough (and I do mean rough) preview of what it will look like before you hit ok.


It was still way too deep for my taste - I wanted cart tracks, not WW I trenches, so I flattened the whole terrain down considerably until it looked something like this:


Next came the fun part of adding in the texture, the trees, grasses, weeds etc. placing the fence and getting the atmosphere the way I wanted it.


This took me literally days.  I would think I had it done and would render it, which involved leaving it to run on its own for three hours. Then I would come back and look at the render and decide I didn't like something, or discover some glaring error which couldn't be fixed in post work.

At least twice I just left the computer rendering while I went to bed, so I wasn't able to get back to the piece until I got home from work the next day.  (Work really does get in the way sometimes)

But finally, I had something I was happy with:- "Country Lane in Fall"


While I really like the original version above, this evening, I played around with it in Photoshop Elements, applying filters. (I don't have Filter Forge, like many digital artists, although if they have a version that will work with Elements on a Mac, I may shell out the bucks for it).  Instead I used the Paint Daubs filter and really love the Impressionist feel it gives the image.


I'm not sure if the Paint Daub effect is even visible at this size, but on a full size 26 " x 15" original, it looks great.  Or at least I think it does, I'd love to hear what others think, if you can even see it at this resolution and size.

I'm now in a quandry as to which version to use as my final image that I post on Fine Art America and that I use to create products for my Zazzle store.  I *think* I'm leaning toward the Impressionist version.  What do you think?


Sunday, July 28, 2013

A Peek Inside the Studio and the Making of "The High Country" (or "Do Keep Up, Tonto!")

It was my birthday last week. We won't go in to details, like how old I am, but I wanted to give a shout out to my wonderful husband, Eric, who willingly parted with a hefty chunk of change to replace my three year old iMac with a new 27 inch iMac.

So I thought I'd give you a peek inside "Mockingbird Studio" and give you an idea of where I work on my art projects.


The fact that the new monitor is much bigger than the one I had before (a mere 21 inch) caused me to have to rearrange my studio.  I used to have my computer on a small desk to the left of this photo, facing over a half wall into the living room and the garden beyond.

The configuration of the desk, with a little printer stand on the side, really didn't work with the bigger monitor.  So I decided to move my new computer over to my former craft desk, which hasn't actually been used for anything other than lounging cats, in the five years we have lived here.  Well that's not quite true -- I sewed some window valances three years ago, but that's about it.

I love this layout already.  There's more actual desktop, so I've got room for some desk accessories and when I want to pay bills, I don't have to shuffle things between my lap, the desk and the drawer.

So what am I working on with my new iMac?

Well, at the art show last weekend, I was talking with one of the other artists and we talked about a scene where a cowboy would be up on a ridge, surveying the scene below, perhaps with a herd of cattle or bison or something.

The thing is, when I started playing around in DAZ and started working on posing the Genesis figure on the DAZ horse, I ended up with the cowboy looking back behind him, and leaning his hand on his horse's rump, like he's waiting for the rest of the riders (or perhaps his trusty sidekick, Tonto) to catch up!  (Thank you to Judy Adamson, a fellow artist who lives in Wales, who came up with the subtitle when I first posted the finished render on Facebook, asking for suggestions for titles)

Once I had the horse and rider the way I wanted them, I saved them as a wavefront object which I would then be able to import into a variety of other 3D graphic software.


Then I opened up Vue, the software I use for creating landscapes and scenery.  I created a foreground terrain and added some weeds and grass to it and placed the horse and rider in the scene, being sure to make sure they weren't either floating three inches above the ground, or sinking down into it.  Then I grouped horse and rider together with the foreground terrain and camera and raised everything up above the ground plane and tilted it forward slightly, to give the illusion of standing on the edge of the ridge looking into the valley. (You can see that grouping in the top right hand segment of the photo below).


Vue gives you four different views at once, so you can see your scene from the front, from the side, from the top and finally, the "camera view".   This will be what you see in the final render - it's the view on the bottom right.

Once I had the horse and rider standing on the ridge, with the valley spread out below, I set about finding a suitable atmosphere for the scene. Vue has a multitude of atmospheres built in, or you can set about creating your own by manually adding layers of cloud, positioning the sun, setting the lighting model and many other functions.

For this scene, I selected one of the atmosphere presets and the moved the sun around until it appears that horse and rider are being highlighted from the side by the sun as it moves lower in the western sky.


I adjusted the levels in Photoshop Elements 11 as the shadows were just too dark in the original render that came out of Vue.  I'm very happy with the result.

Sunday, June 2, 2013

The Making of Dance With Me

When Light, Space and Time Gallery announced their 3rd annual "Figurative" competition, I was hesitant to enter.  I wasn't sure that anything in my portfolio would fit the criteria, but then I remembered "Dance with Me", which I did in 2010.

I had fallen in love with Jack Vettriano's "Dance me to the End of Love" and set about the task of creating a piece with a similar atmosphere to it, using the 3D graphics programs that I was now working with.

It was done in two parts: the background image was created in Bryce 3D and the figures were done in DAZ 3D.

In Bryce, I worked on the ground plane to get a texture that would look similar to the infinite plane the dancers in Vettriano's original were dancing on.

I ended up using a water plane to get the effect I was after.  My dancers are literally dancing on water, lol.

Then I played in the atmosphere editor, positioning the sun and changing the parameters to get the overall color I wanted, and the layer of haze on the horizon.


When I had the background the way I wanted it, I rendered it in Bryce and saved it as a jpeg file that could be used as a backdrop in DAZ 3D.

Now came the really fun part - dressing and posing my 3D characters to recreate the scene and capture the atmosphere of the original.

Since the characters start out in the position shown below (only naked), you can see that quite a bit of work is involved in this step!

Posing a single character in DAZ is fairly easy, even easier if you use one of the many pre-set poses available.  But posing and positioning two characters in a 3D environment, viewed on your 2D computer screen, offers lots of challenges.

For example, when viewed from the front, you might position your characters to be close together as if they were dancing, but then look at them from above and see that they are actually quite some distance apart from one another.  The same can happen if you look from the left or the right too.

So as you work and pose and create your scene, you have to constantly view the scene from all directions to make sure everything is working together.

Eventually, I got my dancers the way I wanted them, as close as I could get them to the dancers in Vettriano's original.  Then I adjusted the lighting to blend with the atmosphere on the background and clicked on RENDER.


Finally I did a little bit of post work in Photoshop Elements - I used the dodge/burn tool to give the illusion of a reflection of the dancers and anchor them to the ground plane, then it was finished.

So, going back to the beginning of my post, when I got the notice about the "Figurative" art competition in April, I went ahead and sent in my entry to Light, Space and Time and now I'm very happy to announce that "Dance with Me" earned a Special Recognition Award!!

The competition received 592 entries from 23 different countries from around the world so you can see how much of an honor this is for me!

All of the winners can be seen here.  My thanks to John Rath for his work in running the Light, Space and Time online gallery and for giving artists like myself the opportunity to participate in competitions and be included in exhibitions.

Sunday, April 21, 2013

Do You Believe in Fairies?

A few years ago, I came upon the most delightful book at a lunch-hour book fair in the downtown Houston building I worked in. It's called "Fairyopolis, A Flower Fairies Journal."
As you open the first page of the book, you can see immediately that it is quite enchanting, being the summer journal of Cicely Mary Barker, famed for her Flower Fairy portraits.
From her handwritten note on the inside cover, you can see that she kept the journal during the summer of 1920 while staying at the home of a friend and then sent it to the British Faerie Folklore Society, to be looked after and preserved after certain incidents led her to believe that she might have witnessed fairy activity!   
It's the kind of journal I've always wanted to keep, hand written in a neat script, with notes, sketches, lists, little envelopes with secret finds and so much more.
I had the most enjoyable afternoon on Saturday, recovering from a head cold, and sitting in the garden listening to the songs of the birds, and the hum of the bees and wondering if possibly the Wee Folk were watching me from behind the jasmine vine :-)
As the sun went down and a chill crept into the air, I felt compelled to create a fairy scene myself. Only I would do it using my computer, instead of my paintbrush. I was looking for my finished piece to have a vintage feel to it, reminiscent of Cicely's own flower Fairies.

Here is the finished article - "The Curious Fairy".  I'm thrilled with how she came out and hope that others like her too.

Fantasy Prints

Sunday, April 14, 2013

Inspiration from Life

My latest digital artwork was inspired by a recent trip to England, where we visited the lovely Cotswold village of Bourton-on-the-Water.

The Cotswolds is an area in the center of England, known for its honey-colored stone architecture and idyllic village scenes. 


We were not blessed with pleasant weather -- in fact on the day we were there it was "bloody freezing!"(to quote my sister, who took us there) -- but I found myself enchanted as always. This particular village has a shallow stream running through it, as its name implies and there are always ducks around, either in the water, or sitting on the grassy banks. 

Feeding the ducks is a popular pastime, in fact it's encouraged.  Several of the little gift shops offered for sale paper bags filled with bird seed, labelled with the words "Feed the Ducks".

That got me thinking and when I got home again, back to my studio and my computer, I began to consider how I might recreate such a scene in Vue.

Luckily, I had some time ago purchased a pack of 3D models from Runtime DNA which had the look of typical Cotswold cottages. I loaded several cottages into the scene and arranged in a row beside the stream, similar to how the cottages are set in the real village.

After creating the basic terrain with the stream channel, I set about finding the perfect texture for the stony stream bed and the water .  Once I had that in, I added grass, benches and trees to fill out the scene.


Then it was time to create the figures that would populate the scene.  I envisioned a small child feeding ducks on the banks of the stream.  Here's the figure I created in DAZ 3D.  This render was done in DAZ, prior to the figure being exported to Vue.

I felt a small child shouldn't be left unsupervised to feed the ducks, so I added a mom and dad to the scene, lol. Dad is sitting on the bench watching benevolently as his wife offers duck-feeding guidance to their daughter. I think I hear the words "mind that big one doesn't peck your fingers!"

My computer was really dragging by the time I got everything in. An "eco-system" like this, with lots of grass or trees, tends to suck up the computer's resources and I had a scare when Vue shut down and then claimed it was unable to open the file again! 

Luckily, my computer-savvy husband was able to rename one of the backup files and open it up, so I was able to finally finish the project and do the final render, which you can see below.


As I mentioned at the beginning, my inspiration for this piece came from a real-life place.

Where does your artistic inspiration come from?  Are the scenes you paint imaginary places, or are they places and people you have seen?


Sunday, December 30, 2012

The Making of Winter Snowscape

The first 3D art program that I used was Bryce, by DAZ Productions.

My husband Eric introduced me to it and I was thrilled that here was something I could use to create art that the cats couldn't get into and mess up and they seemed to manage to do with other arts and crafts projects!

Eric's sister, Michele, also uses Bryce for her art and I noticed right away that she was a very prolific artist.  This inspired me to learn all I could about the program and start creating in it!

I spent a lot of time over the Christmas season on 2007 listening to Jethro Tull's Christmas Album. It's still one of my favorites but then it was even more special as it had been the first Christmas gift Eric had bought for me, before we were married.  Since he was travelling on business that Christmas (bummer) I listened to that album almost 24/7 as a way of keeping Eric near.


I really loved the cover art of that album. As I listened, I began to wonder if I could recreate the scene, or at least evoke the feel of it, in my newfound obsession, Bryce.

So I started out by opening a scene with the default ground and sky in Bryce.  Then I had to consider where to get or create a building that looked similar to the one on the album cover. Bryce comes with landscape features built-in -- the terrains, atmosphere and texture editors.  But it doesn't have any man made objects - they have to be purchased, or obtained as "freebies" from one of the 3D art content providers.


I found this one as a freebie at 3D Commune, which sadly is no longer online.  I felt it had promise, but obviously, I was going to need to either find or make a texture for it.


I was able to find a texture that simulated the brickwork.  I still would have to find/make a "snowy" texture for the roof parts and perhaps have some lights glowing at the windows.


But first I needed to make the scenery look a bit more wintery.  I added some basic mountain terrains and moved them to the back of the scene, and added a snowy texture to the ground plane.


In this one, you can see I've added some snow to the roof parts of the building.  It gets a little tricky adding textures to these 3D models because you have to identify, out of the hundreds of meshes that make up the whole object, which ones are which.  It's especially difficult if the parts are named in a foreign language.


Here, I've located all the windows in the mesh and applied a yellow glow and I've also started working on the atmosphere to try and come close, or at least get the same feel, as the inspiration piece.


I continued to tweak the atmosphere and  I also added some more houses, all objects found free at Renderosity or 3D Commune.


To add a little more detail to the scene, I added some trees - both pine trees and leafless winter trees - to fill out the scene and make it look more complete.


I might have decided to call it finished at this point, but I had been doing quite a bit of work in another 3D program, DAZ|Studio, also by DAZ Productions, and it offered me a chance to do something I hadn't been able to do in Bryce up to that point -- add people to my scenes.

Whereas Bryce is specifically for creating digital landscapes, DAZ|Studio is a program in which you can create characters for your scenes by using 3D models to which you add textures and clothing and then pose them. Scenes can be rendered within DAZ|Studio, using a photographic backdrop for the 3D models, or the models themselves can be exported and used in programs such as Bryce and Vue, which is what I did here.


Looking back on this now, I see I changed the atmosphere again.  Not sure I like this version, it's too yellow to my eye, I prefer the previous version, but this was the one I went with in the end.


I added some more characters, as well as a horse and sleigh (which I really had fun creating in DAZ|Studio) and that was it, finished.

Of course, it's difficult to see the detail in these small images, so you can click on this one to see a larger version of the finished render.


As I said at the beginning of this post, I was inspired by the cover artwork on Jethro Tull's Christmas Album.


Do you think I captured the essence and feel of it?